The ESP32MiniSD is a compact add-on board designed for Seeed Studio’s XIAO ESP32-C3, XIAO ESP32-C6 or XIAO ESP32-S3, enabling microSD card storage, battery monitoring, and USB charging capabilities. In this tutorial, we’ll guide you through setting up and using the ESP32MiniSD with an ESP32 XIAO module to read and write files to a microSD card.
Unlike Adafruit’s Xiao ESP32, the ESP32MiniSD is designed to get the most out of the ESP32’s capabilities, with a focus on storage and power management. The board features a microSD card slot connecting SD card to ESP32, battery monitoring, and charging circuitry, making it ideal for ESP32 SD card integrations including data logging, file storage, and portable IoT devices. Let’s dive into the setup and usage of the ESP32MiniSD with the XIAO ESP32 module!

Features of ESP32MiniSD
- MicroSD Card Support: Adds storage to your ESP32 projects with a ESP32 S3 microSD module for logging or file storage.
- Battery Support: Connect a LiPo battery with onboard charging via USB.
- Compact Design: Slim and minimal, perfect for small form-factor projects.
What You’ll Need
- ESP32MiniSD board featuring an integrated microSD module for ESP32
- XIAO ESP32-C3, XIAO ESP32-C6 or XIAO ESP32-S3
- microSD card (formatted as FAT32)
- USB-C cable
- Optional: LiPo battery for portable operation
Step 1: Hardware Setup
Assembling the ESP32MiniSD
- Solder the XIAO ESP32 to the ESP32MiniSD board.
- Insert your microSD card into the card slot on the ESP32MiniSD.
- Optionally, connect a LiPo battery to the designated pads on the board for portable use.
Wiring
The ESP32 microSD card adapter uses specific pins for the SPI interface.
- CS (Chip Select): D2
- MOSI (Master Out Slave In): D3
- MISO (Master In Slave Out): D5
- SCLK (Clock): D4
For battery voltage monitoring:
- METER_EN: D1
- METER: D0 (Analog input)
Additional pin information available on the github pin configuration section
Step 2: Software Setup
Arduino IDE Configuration
- Download and Install the latest version of Arduino IDE according to your operating system
- Launch the Arduino application
- Add ESP32 board package to your Arduino IDE:
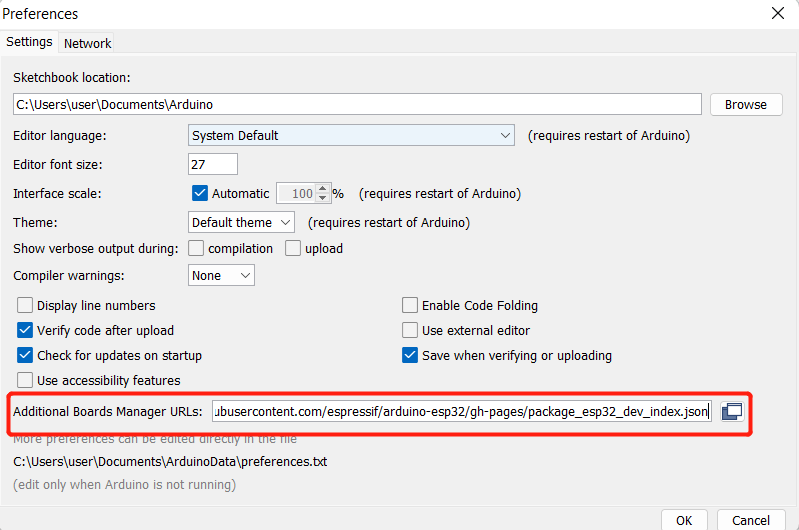
- Navigate to File > Preferences, and fill “Additional Boards Manager URLs” with the url below:
https://raw.githubusercontent.com/espressif/arduino-esp32/gh-pages/package_esp32_index.json
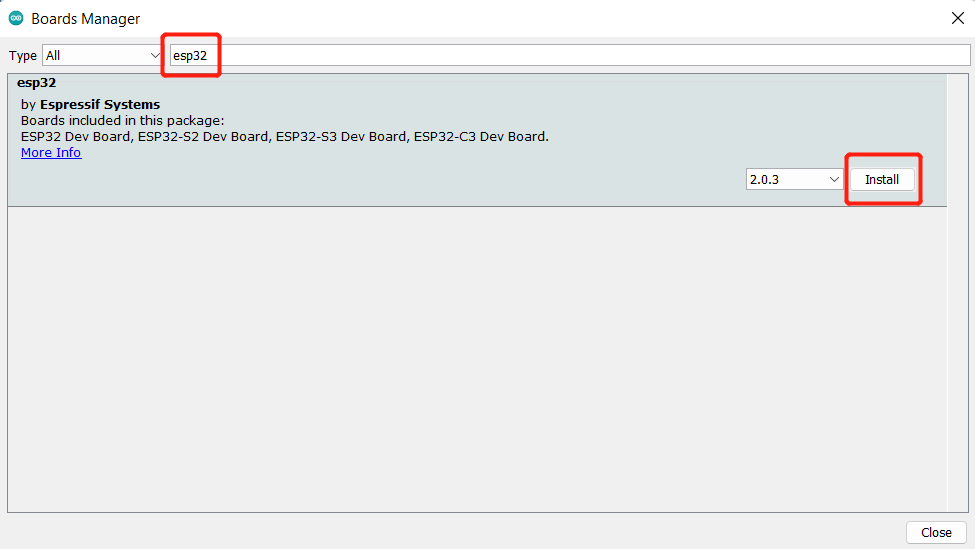
- Navigate to Tools > Board > Boards Manager…, type the keyword
esp32in the search box, select the latest version of esp32, and install it.
Step 3: Example Code
Here’s a simple program to initialize the microSD card and list its files:
 #include <SD.h>
#include <SPI.h>

// Define chip select pin for SD card
const int chipSelect = 4;

void setup() {
  Serial.begin(115200);
  delay(1000); // Allow time for the Serial Monitor to initialize

  Serial.println("Initializing SD card...");

  if (!SD.begin(chipSelect)) {
    Serial.println("Card mount failed");
    return;
  }

  Serial.println("Card initialized successfully.");
  listFiles("/");
}

void loop() {
  // Keep the loop empty for this example
}

void listFiles(const char *dirname) {
  File root = SD.open(dirname);
  if (!root) {
    Serial.println("Failed to open directory");
    return;
  }

  while (true) {
    File entry = root.openNextFile();
    if (!entry) {
      break; // No more files
    }
    Serial.print(entry.name());
    if (entry.isDirectory()) {
      Serial.println("/");
      listFiles(entry.name());
    } else {
      Serial.print("\t");
      Serial.println(entry.size());
    }
    entry.close();
  }
}
What This Code Does
1. Initializes the SD card. 2. Lists all files and directories in the root folder.
Upload the code to your XIAO ESP32 using the Arduino IDE, then open the Serial Monitor to see the output.
Step 4: Testing and Troubleshooting
1. Testing:
* After uploading the code, open the Serial Monitor at 115200 baud.
* If the SD card initializes successfully, you’ll see a list of files on the card.
2. Common Issues:
* Card Mount Failed: Ensure your SD card is formatted as FAT32.
* No Files Detected: Double-check the configuration and card insertion.
Applications of the ESP32MiniSD
With leftover pins for additional sensors or peripherals (D7,D8,D9), the ESP32MiniSD is ideal for a variety of applications:
- Data Logging: Use as a ESP32 data logging SD card, ideal for recording sensor data such as temperature, humidity, or GPS coordinates.
- File Storage: Extend the memory of your ESP32 for larger programs or file operations.
- Portable Devices: Use the LiPo battery support for standalone IoT devices.
- Battery Monitoring: Keep track of your battery levels for efficient power management.
- USB Charging: Connect the battery pins to a battery holder and charge via USB and monitor the battery levels.
Buy the ESP32MiniSD
With the ESP32MiniSD, you can easily add an SD card to ESP32 projects for expanded storage. Whether you’re working on ESP32 data logging SD card applications or building a MicroSD expansion for ESP32-S3, this versatile board simplifies the process. Pair it with the XIAO ESP32-C3/C6, and you’re ready to tackle complex, data-heavy applications! You can get both the ESP32MiniSD and XIAO ESP32-C3/C6 from SiloCityLabs.
For more information, visit the official GitHub repository.